How to Integrate Google Pay into Your Android App
The easier it is to pay, the more people will buy from you. This is the golden rule of any digital business. People are used to fast and convenient service, and this is exactly what Google Pay provides
According to Annex Cloud, a business can lose up to 80% of all potential customers at the checkout because of an inconvenient payment procedure. Why is that?
- Customers know that they can always look for a similar product elsewhere
- Customers don’t trust your payment processor and fear exposure of their personal data
- Customers don’t already use your preferred payment method, so they need to perform additional actions
- An unclear UI and poor UX makes customers transition between many screens
That’s why before you integrate any payment processor into your mobile app, you should make sure it’s convenient, is used by your target audience, and is secure. Google Pay integration is what lots of businesses choose, as Google Pay is one of the best options for Android users across the world, as it works everywhere and is secure.

Google announced the launch of its own payment gateway called Google Wallet in 2011 at Google I/O – the annual Google developer conference. In 2015, Google released a separate application for Android devices called Android Pay.
The main advantage of Android Pay was the ability to pay in stores and keep all loyalty cards in the app. In 2018, Google merged Google Wallet and Android Pay into one application called Google Pay.
Airbnb reported an 11x increase in online payments after integrating Google Pay into their mobile application
In this article, I’ll discuss why Google Pay is good for your business, and how to use Google Pay Android. Then I’ll provide you with a tutorial on Google Pay API integration into your app.
Why Google Pay is great for business
With Google Pay, users need to perform only three actions to pay for purchases in your mobile app:
- Press the Pay with Google button
- Choose a payment card
- Confirm the payment
Additionally, a user can specify a delivery method in their Google account to avoid entering delivery information again and again.
This simple payment method has become so popular among users that by September 2018 the app had already been downloaded 100 million times. Airbnb reported an 11x increase in online payments after integrating Google Pay into their mobile application.

While many other payment services like PayPal and Braintree charge a fee for using their service, Google Pay is free. This is great for businesses, as they lose about $0.30 per transaction plus 3% of the transaction total with PayPal or Braintree.
Google Pay is available for all vendors in countries where Google provides its services. You can use Google Pay to connect several dozen payment gateways in a single interface. It’s also easy to integrate: see for yourself in our tutorial.
Here’re some business advantages of Google Pay:
- G-Pay is free,
- Easy to integrate,
- Opens access to hundreds of cards,
- This dramatically increases the number of conversions,
- This increases your income.
Google Pay is available to all providers of goods and services in the countries in which this service is supported. Implementing Google Pay in an Android solution is a great way to connect a user with dozens of payment systems around the world through a single interface. It integrates seamlessly into an Android app development project.
Google Pay Update 2020
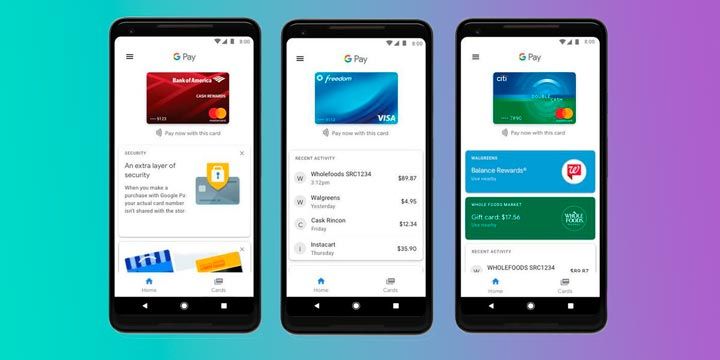
Here’s an overview of each tab – Pay, Explore, and Insights – in the new Google Pay app.
Pay
When you open the Google Pay app, you will be taken to the Pay tab, which is also the main one. From here, you can pay, view past transactions, and find offers and loyalty information.
You can send and receive money from one or more people with a new group function that makes it easy to split accounts. The businesses section allows you to view loyalty cards from retailers like Costco, as well as see expenses and credits.
The Pay tab also lets you order food at over 100,000 restaurants, buy gas at over 30,000 gas stations, and pay for parking in over 400 cities without leaving the Google Pay app. Easier ways to pay for everyday things from within the app are coming soon.
Explore
The Explore tab lets you save money and take advantage of offers right in the Google Pay app without clipping coupons or searching online for promo codes. Instead, you can download offers from brands like Burger King, Etsy, REI Co-op, Sweetgreen, Target, and Warby Parker into your Google Pay account and start saving.
Once the offer has been activated, you can automatically activate the deal when you pay in a store or online using your Google Pay account or linked card.
You can also scan product barcodes and QR codes with Google lens technology, which will give you more information like how much it costs.
Insights
When you link your bank accounts and credit cards (which is optional and disabled by default), you can get information about how much money you have and how much you spent.
Google Pay can also automatically organize your spending and allows you to search for transactions in the broadest sense of the word, such as “food” or specifically “Mexican restaurants.” You can also search your receipts (once enabled) and get notified of upcoming subscription bills.
The Insights tab also displays your Google Pay balance.
Google Pay integration tutorial
The first thing you need to do to integrate Google Pay is add a library to your project. To do that, add this dependency to your gradle file:
implementation 'com.google.android.gms:play-services-wallet:$version'
Here, $version is the version of the library we’re going to use. Currently, 18.1.2 is the most recent. If you need more detailed instructions on setting up a library, you can visit Google’s developer documentation. There, you’ll also find information on the types of libraries Google Play Services offer to programmers.
Let’s assume you already have a product or a service you’d like to sell. All you need to do now is set up the purchasing process. For this, let’s initialize a payment client:
private PaymentsClient mPaymentsClient;

mPaymentsClient = PaymentsUtil.createPaymentsClient(this);

public static PaymentsClient createPaymentsClient(Activity activity) {
   Wallet.WalletOptions walletOptions =new Wallet.WalletOptions.Builder()
       .setEnvironment(Constants.PAYMENTS_ENVIRONMENT)
       .setTheme(WalletConstants.THEME_DARK)
       .build();
   return Wallet.getPaymentsClient(activity, walletOptions);
}
Then you should choose a WalletConstants.ENVIRONMENT_TEST – a type of environment for your PAYMENTS_ENVIRONMENT.
The next step is to check whether you can actually make a purchase using Google Pay. This is how you can do it:
private void possiblyShowGooglePayButton() {
    final Optional isReadyToPayJson = PaymentsUtil.getIsReadyToPayRequest();
    if (!isReadyToPayJson.isPresent()) {
        return;
    }
    IsReadyToPayRequest request = IsReadyToPayRequest
        .fromJson(isReadyToPayJson.get().toString());
    if (request == null) {
        return;
    }

    Task task = mPaymentsClient.isReadyToPay(request);
    task.addOnCompleteListener(this,new OnCompleteListener() {
        @Override
        public void onComplete(@NonNull Task task) {
            if (task.isSuccessful()) {
               setGooglePayAvailable(task.getResult());
            } else {
                Log.w("isReadyToPay failed", task.getException());
            }
        }
    });
}
If everything is processed correctly, you then can put a Pay with Google button on your checkout screen.
private void setGooglePayButtonAvailable(boolean available) {
   if (available) {
       mGooglePayStatusText.setText("Payment status: Supported");
       mGooglePayButton.setVisibility(View.VISIBLE);
   } else {
       mGooglePayStatusText.setText("Payment status: Not supported");
   }
}
Setting up other payment gateways and search for available payment cards is handled by a static method called PaymentsUtil.getIsReadyToPayRequest. To make it work, you need to specify this information:
- Your app’s API version
JSONObject().put("apiVersion", 2).put("apiVersionMinor", 0);
JSONObject tokenizationSpecification = new JSONObject();
  tokenizationSpecification.put("type", "PAYMENT_GATEWAY");
  tokenizationSpecification.put(
      "parameters",
      new JSONObject()
          .put("gateway", "example")
          .put("gatewayMerchantId", "exampleMerchantId"));
private static JSONArray getAllowedCardNetworks() {
  return new JSONArray()
      .put("AMEX")
      .put("DISCOVER")
      .put("JCB")
      .put("MASTERCARD")
      .put("VISA");
}
private static JSONArray getAllowedCardAuthMethods() {
  return new JSONArray()
      .put("PAN_ONLY")
      .put("CRYPTOGRAM_3DS");
}
JSONObject cardPaymentMethod = new JSONObject();
  cardPaymentMethod.put("type", "CARD");
Payment processing
Now that you’re done setting up everything regarding payment gateways, the hard part is ahead: processing a payment.
mGooglePayButton.setOnClickListener(
       new View.OnClickListener() {
           @Override
           public void onClick(View view) {
               requestPayment(view);
           }
       });
Keep in mind that when processing a payment, Google Pay (like most other payment gateways) uses the minimum possible currency value. For example, if you specify a withdrawal of 156358, this means that you’d like to withdraw $1563.58.
The next step is to build a JSONObject from the entities we’ve created earlier:
public static OptionalgetPaymentDataRequest(String price) { try { JSONObject paymentDataRequest = PaymentsUtil.getBaseRequest(); paymentDataRequest.put( "allowedPaymentMethods", new JSONArray() .put(PaymentsUtil.getCardPaymentMethod())); paymentDataRequest.put( "transactionInfo", PaymentsUtil.getTransactionInfo(price)); paymentDataRequest.put( "merchantInfo", PaymentsUtil.getMerchantInfo()); paymentDataRequest.put( "shippingAddressParameters", shippingAddressParameters); return Optional.of(paymentDataRequest); } catch (JSONException e) { return Optional.empty(); } }
Then you need to set up the transaction. Don’t forget to specify the currency:
private static JSONObject getTransactionInfo(String price) throws JSONException {
   JSONObject transactionInfo = new JSONObject();
   transactionInfo.put("totalPrice", price);
   transactionInfo.put("totalPriceStatus", "FINAL");
   transactionInfo.put("currencyCode", “USD”);
   return transactionInfo;
}
Build a PaymentDataRequest object inside the requestPayment method. This object is basically a request for required payment information. To make a request automatically, use AutoResolveHelper.
public void requestPayment(View view) {
   mGooglePayButton.setClickable(false);

   String price = PaymentsUtil.microsToString(item.getPriceMicros());
   Optional paymentDataRequestJson =
           PaymentsUtil.getPaymentDataRequest(15635);
   PaymentDataRequest request =
           PaymentDataRequest.fromJson(paymentDataRequestJson.get().toString());


   AutoResolveHelper.resolveTask(
               mPaymentsClient.loadPaymentData(request),
               this,
               LOAD_PAYMENT_DATA_REQUEST_CODE);
}
Now you’ve formed the request and sent it. Your next step is to process the result of this request:
public void onActivityResult(int requestCode, int resultCode, Intent data) {
   switch (requestCode) {
       case LOAD_PAYMENT_DATA_REQUEST_CODE:
           switch (resultCode) {
               case Activity.RESULT_OK:
                   PaymentData paymentData = PaymentData.getFromIntent(data);
                   handlePaymentSuccess(paymentData);
                   break;
               case Activity.RESULT_CANCELED:
                   break;
               case AutoResolveHelper.RESULT_ERROR:
                   Status status = AutoResolveHelper.getStatusFromIntent(data);
                   handleError(status.getStatusCode());
                   break;
               default:
           }


           mGooglePayButton.setClickable(true);
           break;
   }
}
This is where you can link Google Pay to the business logic of your app. For example, you can specify what information you’d like to show on a screen to thank your users for their purchase, or switch to the next screen.
private void handlePaymentSuccess(PaymentData paymentData) {
     Toast.makeText(this, "Payment Success", Toast.LENGTH_LONG).show()
}

private void handleError(int statusCode) {
   Log.w("loadPaymentData failed", String.format("Error code: %d", statusCode))
}
That’s it! Now you know how to add Android Pay service with the help of Google Pay.
Final thoughts
Google Pay is a modern, safe, and extremely convenient payment service that allows you to integrate many payment processors at once. It makes payments more convenient for your users and therefore increases your revenue from online sales. Google pay payment gateway integration is one of the easiest ways to get payments from your customers.
We’ve provided you with detailed instructions on integrating Google Pay into your Android app. If you have any further questions on how to integrate Google wallet into app or any other payment gateway into your app, be sure to contact us.
Our engineers have experience creating enterprise-sized e-commerce applications as well as mobile apps for small retailers and have a knack for integrating payment services into digital solutions that sell.


