Pros and Cons of Working with Storyboards
Storyboards appeared with the release of iOS 5 back in 2011, and till this day Apple continues to improve them. It seems like Apple considers storyboards the UI design tool of the future. Are they really? What are the pros and cons of using storyboards?
Introduction
When it comes to a new mobile app development project and user interface design, each iOS developer basically has to choose among these options for developing the UI:
- Write it in code from scratch
- Use XIBs
- Use storyboards
Custom code is the classic approach to UI development, where everything from animations to positioning is handled in code.
XIBs (formerly NIBs) are separate components that each correspond to a single element in your user interface. The term XIB is derived from the file extension .xib. You can also build UI with XIBs and make them visual using the XCode Interface Builder.
Storyboards are used to visually represent your UI. With the help of storyboards, you can show app views and how they relate using segues (transitions).
In this article, we’ll tell you about the peculiarities of developing with storyboards, talk about their storyboard pros and cons, and compare them to the other two development strategies we’ve just mentioned.
Storyboards
Storyboards were released by Apple with the intention to make UI creation easier and more visual. This addition to the iOS UI toolkit was positioned as a full replacement for XIBs and promised to free developers from the necessity to write custom UI code.
But are storyboards really a complete substitute? Probably not. Storyboards are truly a great tool for developers, but they’re not suitable for all situations and it’s best to use them in tandem with XIBs and custom code elements.
However, there are definitely many mainstream apps built with storyboards.
Pros
The most obvious benefit of using storyboards is visualization. Storyboards allow you to see how your app will work and mock up its design and flow without writing hundreds of lines of code.
There are three situations in which storyboards are especially useful.
The first is when you’re a beginner developer. The idea of drag-and-drop elements to create an app and visualize how it will work is quite appealing to beginner developers. Trying to create a UI with custom code can be daunting, and we’re sure that storyboards have inspired many iOS developers in their early days. However, experienced developers also use storyboards, combining them with other strategies.
Another use case is when you need to implement a static part in your application. In this case, storyboards can help you with a static flow because they basically are a WYSIWYG tool.
Storyboards are also the perfect solution if you want to see a general app flow without actually building an app. They’re good for prototyping and demonstrating an app before development begins.
Also, storyboards are well supported. There’s evidence that Apple believe storyboards to be a great solution for developers. For example, you need to use them for UIs in WatchOS.
Cons
Unfortunately, along with all these upsides there are also many downsides to using storyboards.
The first is merge conflicts. If your team includes more than one iOS developer, using storyboards becomes nearly impossible. If you copy your code or move it, problems with dependencies are inevitable.
Since storyboards are in a specific file, resolving conflicts can be complex and can result in losing some of your work.
One of the main disadvantages of storyboarding is problems with code review. Storyboards use the XML format, and lots of unclear elements can make it difficult for new developers who join your team to understand what’s actually going on in your app.
Working with segues can also be problematic. Of course, storyboards are great in terms of allowing you to look at the overall flow of your app, but when it comes to passing data between view controllers, storyboards aren’t so great. Usually, the result is a huge method called something like prepareForSegue().
So storyboards are okay for small applications, but using them to build big, complex apps can result in this mess:
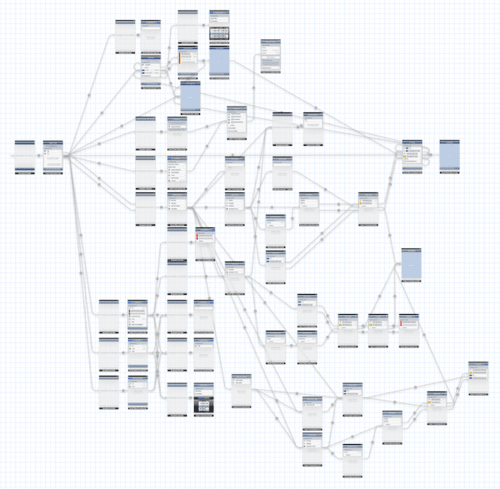
Even if you’re the only iOS developer on your team, you’ll still have a hard time understanding what’s happening when the arrows start hiding behind and overlapping view controllers.
In the end, storyboards are still a useful tool, but you should note that they have their own bugs.
Now let’s talk about the pros and cons of other options for developing your app’s UI.
XIBs
XIBs are the classic way to develop a UI in iOS. A single XIB represents only one visual element – for example, a controller. XIBs are perfect when the same element repeats across your application. Copying it with code or with storyboards is too time consuming and complex.
Pros
Compared to storyboards, XIBs are more diversified, which means that they aren’t as closely connected. This is their first and most important advantage: reusability. You can create an XIB once, then use it for different classes. This saves a lot of development time.
With XIBs, you can also use an auto layout option and make a visual tool out of them to help you visualize all your actions.
Cons
Though XIBs are more portable units than storyboards, they also can become a source of many conflicts in your code. Moreover, it’s hard to debug XIBs if you forget about connecting them to the Interface Builder or delete something.
Also, note that XIBs are downloaded lazily. On the one hand, this is an advantage, as they allow your app to load faster because they don’t take up memory until necessary. On the other hand, the latency connected with lazy downloads is a downside.
Custom code
Even if you’re a beginner developer, you should know that everything you can accomplish using storyboards and XIBs is also possible in raw code. You should use code if you need effects like shadows or dynamic layouts.
Pros
The most obvious advantage of pure code is performance. The ability to customize all elements and fully control what’s happening in your app is also important, especially for complex apps.
Another great thing about writing your UI in code is its reusability. Just like with XIBs, you can reuse similar elements over and over again.
The greatest disadvantage of both XIBs and storyboards – merge conflicts – also won’t bother you if you use code. Code makes it much easier to fix bugs and conflicts.
Cons
The one thing that code can’t do is show you what you’ll get until you see it on the screen. This is what code lacks compared to storyboards, and this means that to see every tiny change you’ll need to rebuild the whole app. The number of iterations you’ll need to do can truly drive you crazy.
You can be sure that you’ll need lots of code to implement a UI this way. And this makes the UI harder to understand for new members of your development team.
A hand-coded layout won’t be easy to implement, as you’ll need to add all the constraints with code. It’s time consuming and difficult.
We’ll show an example so you can understand clearly what the difference is between using storyboards and pure code to implement your UI.
Storyboards vs Code
We’ll choose a small, simple project and implement it first with storyboards, then with code.
Our UI will contain two equal-sized square images placed side by side at the center of the screen. The images will have a fixed offset from the screen edges and will be scaled proportionally for each screen size/interface orientation. There will also be a label with a description below the images.
Storyboard/Xib with constraints:
All UI elements and layout can be implemented without any code. Here’s how it looks in the Xcode storyboard editor.
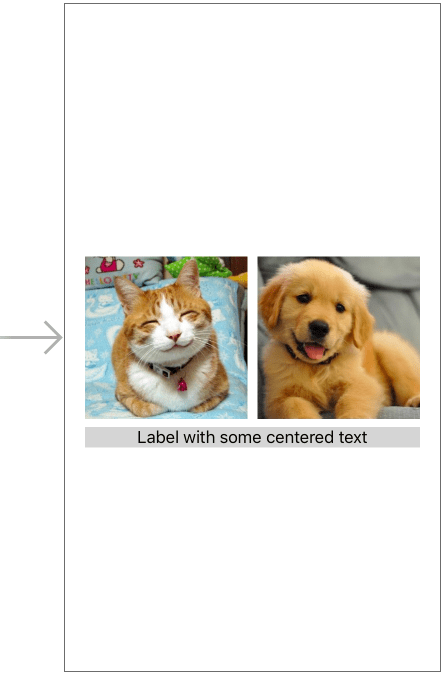
Here are all the constraints we added.
For the left image:
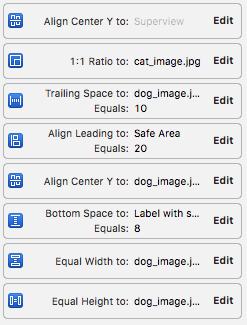
- Vertical center alignment in superview
- Aspect ratio 1:1 to make image square
- Trailing space 10px to the right of the image for padding between images
- Leading space 20px to offset from the left edge of the screen
- Vertical center alignment with right image
- Bottom space 8px to label
- Equal width to right image
- Equal height to right image
For the right image:
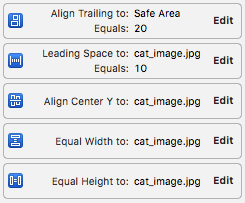
- Trailing space 20px to offset from the right edge of the screen
- Leading space 10 to the left image for padding between images
- Vertical center alignment with left image
- Equal width to left image
- Equal height to left image
For the label:
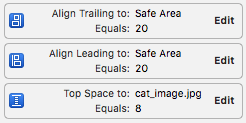
- Trailing space 20px to offset from the right edge of the screen
- Leading space 20px to offset from the left edge of the screen
- top space 8px for space between images and label
Here’s the resulting view in portrait and landscape orientations:


SwiftUI vs Storyboard
SwiftUI is the latest framework that Apple has released to build User Interfaces. It’s a Swift-only framework. SwiftUI leverages the full range of Swift’s functionality – value types, opaque return types, protocol extensions, and more.
SwiftUI fixes many problems developers had with the old Swift + Interface Builder approach:
- The code is much easier to read and manage than the storyboard XML.
- The number of strongly typed APIs is significantly lower.
- The user interface gets checked by the Swift compiler.
Let’s compare SwiftUI and storyboards.
Use Swift UI when:
- The app size is large
- The number of developers on the project is two and more
- The app will not support IOS versions below iOS13
Use storyboards when:
- The app size is small or medium
- The number of developers on the project is one
- The app will support IOS versions below iOS13
Adding constraints with code
This is the code we would need to accomplish this same task in Swift 4:
func layoutElements() {
        let leftImageView = UIImageView.init(image: UIImage.init(named: "cat_image.jpg"))
        self.view.addSubview(leftImageView);

        let rightImageView = UIImageView.init(image: UIImage.init(named: "dog_image.jpg"))
        self.view.addSubview(rightImageView)

        let label = UILabel.init()
        label.text = "Label with some centered text"
        label.textAlignment = .center
        label.backgroundColor = .lightGray
        self.view.addSubview(label)
As we’re adding all the constraints ourselves, we’ll need to disable the autoresizing mask for all views:
leftImageView.translatesAutoresizingMaskIntoConstraints = false
        rightImageView.translatesAutoresizingMaskIntoConstraints = false
        label.translatesAutoresizingMaskIntoConstraints = false
This piece of code will establish a square aspect ratio for the left image:
NSLayoutConstraint.init(item: leftImageView, attribute: .width, relatedBy: .equal, toItem: leftImageView, attribute: .height, multiplier: 1.0, constant: 0).isActive = true;
Now we’ll need to make the right image equal in size and aspect ratio to the left image:
NSLayoutConstraint.init(item: rightImageView, attribute: .width, relatedBy: .equal, toItem: leftImageView, attribute: .width, multiplier: 1.0, constant: 0).isActive = true;
        NSLayoutConstraint.init(item: rightImageView, attribute: .height, relatedBy: .equal, toItem: leftImageView, attribute: .height, multiplier: 1.0, constant: 0).isActive = true;
After we make our images the same size, we need to align them in the parent view in order to center them. First, we’ll align the left view:
NSLayoutConstraint.init(item: leftImageView, attribute: .centerY, relatedBy: .equal, toItem: self.view, attribute: .centerY, multiplier: 1.0, constant: 0).isActive = true;
Then we’ll align the right view. After that, we’ll be able to center them both in the parent view:
NSLayoutConstraint.init(item: rightImageView, attribute: .centerY, relatedBy: .equal, toItem: leftImageView, attribute: .centerY, multiplier: 1.0, constant: 0).isActive = true;
This code is used for the horizontal stack layout for the images:
let views = ["leftView": leftImageView, "rightView": rightImageView, "label" : label]
        let horizontalConstraints = NSLayoutConstraint.constraints(withVisualFormat: "H:|-20-[rightView]-10-[leftView]-20-|", options: NSLayoutFormatOptions.alignAllCenterY, metrics: nil, views: views)
        NSLayoutConstraint.activate(horizontalConstraints)
And this is for the horizontal stack layout for the label:
  let labelView = ["label" : label]
        let labelHorizontalConstraints = NSLayoutConstraint.constraints(withVisualFormat: "H:|-20-[label]-20-|", options: NSLayoutFormatOptions.alignAllCenterX, metrics: nil, views: labelView)
        NSLayoutConstraint.activate(labelHorizontalConstraints)
You’ll need this code for the label layout to align the images vertically with 8px of space at the bottom:
NSLayoutConstraint.init(item: label, attribute: NSLayoutAttribute.top, relatedBy: .equal, toItem: leftImageView, attribute: .bottom, multiplier: 1.0, constant: 8.0).isActive = true;
    }
As you can see, you’ll need to do a lot more work to code a mobile app UI by hand. Sure, you’ll be able to customize everything according to your needs – but it will take lots of time.
Why use storyboards? Firstly, for prototyping and visualization. From our experience, the best way to use storyboards is alongside both XIBs and code. Each of these methods is good in different situations, and each helps you achieve different goals effectively. You just need to know, when to use these tools in building the UI for your mobile app.
If you have any questions about mobile development for iOS or you want to know more about how to build your app with storyboards, contact Mobindustry, and we’ll share our knowledge and experience with you!
Article written by:
Alexander Hryhorchuk


