Tips on Implementing In-App Purchases to Monetize Your App
Isn’t it weird to spend money on food that you aren’t even going to eat? It appears that it isn’t.
People gladly spend real money on virtual goods in their favorite mobile applications. This is called in-app purchasing, and it’s one of the best mechanisms for monetizing your app.
App monetization
There are several ways to make money from your app. The most obvious one is to make the application paid. However, if you are a startup or your brand is not so famous, and there are lots of competitors, persuading people to buy your application right away is quite a challenge.
Free trial is a good solution to this. However, there is an interesting alternative, and as you might have guessed by now, it is in-app purchasing.
What is in-app purchasing?
In-app purchasing (IAP) is a process of buying digital content from a mobile application. There is a great variety of things you can sell in your app, but first you have to define, which types of purchases you want your users to make.
In general there are three types of in-app purchases:
- Consumables
- Non-consumables
- Subscriptions
Consumables are purchases that can be made several times. For example, in a mobile game Eliminate a user buys energy. Otherwise, he needs to wait for 3 hours for it to restore. So, if a user wants to continue playing without these pauses, he or she needs to buy energy over and over again.
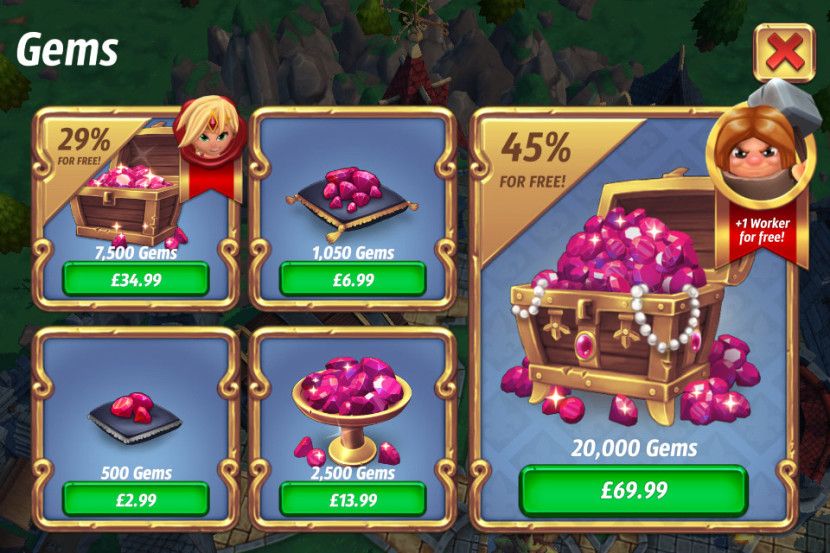
Consumable purchase is very popular in mobile gaming, especially in case of internal currency. There are two types of internal currency – Soft and Hard one. Gamers earn Soft currency as they play the game, and Hard currency can only be purchased through an IAP.

This way a user has a choice whether to play for free and earn the currency or save time and buy it to boost the speed of progressing in the game.
Non-consumables or entitlements are one-time purchases.
They are also very popular in games – users can buy extra levels, upgrades or characters they can play. Non-consumables also include different items for the game characters like weapons, armor, clothes and so on.
However, non-consumables concern not only mobile games. You can provide several themes for your app and let your users customize it, or offer additional features to any kind of app, from business to fitness.
Subscriptions are a well known type of monetization that means that users will pay you a certain sum of money each day/week/month/year to get the access to your application or some additional features that are otherwise locked.
In this case your application is free for everyone, but the free version is rather simple with minimum features. Premium accounts that will require subscribing need to have some features that will add more value to the app.
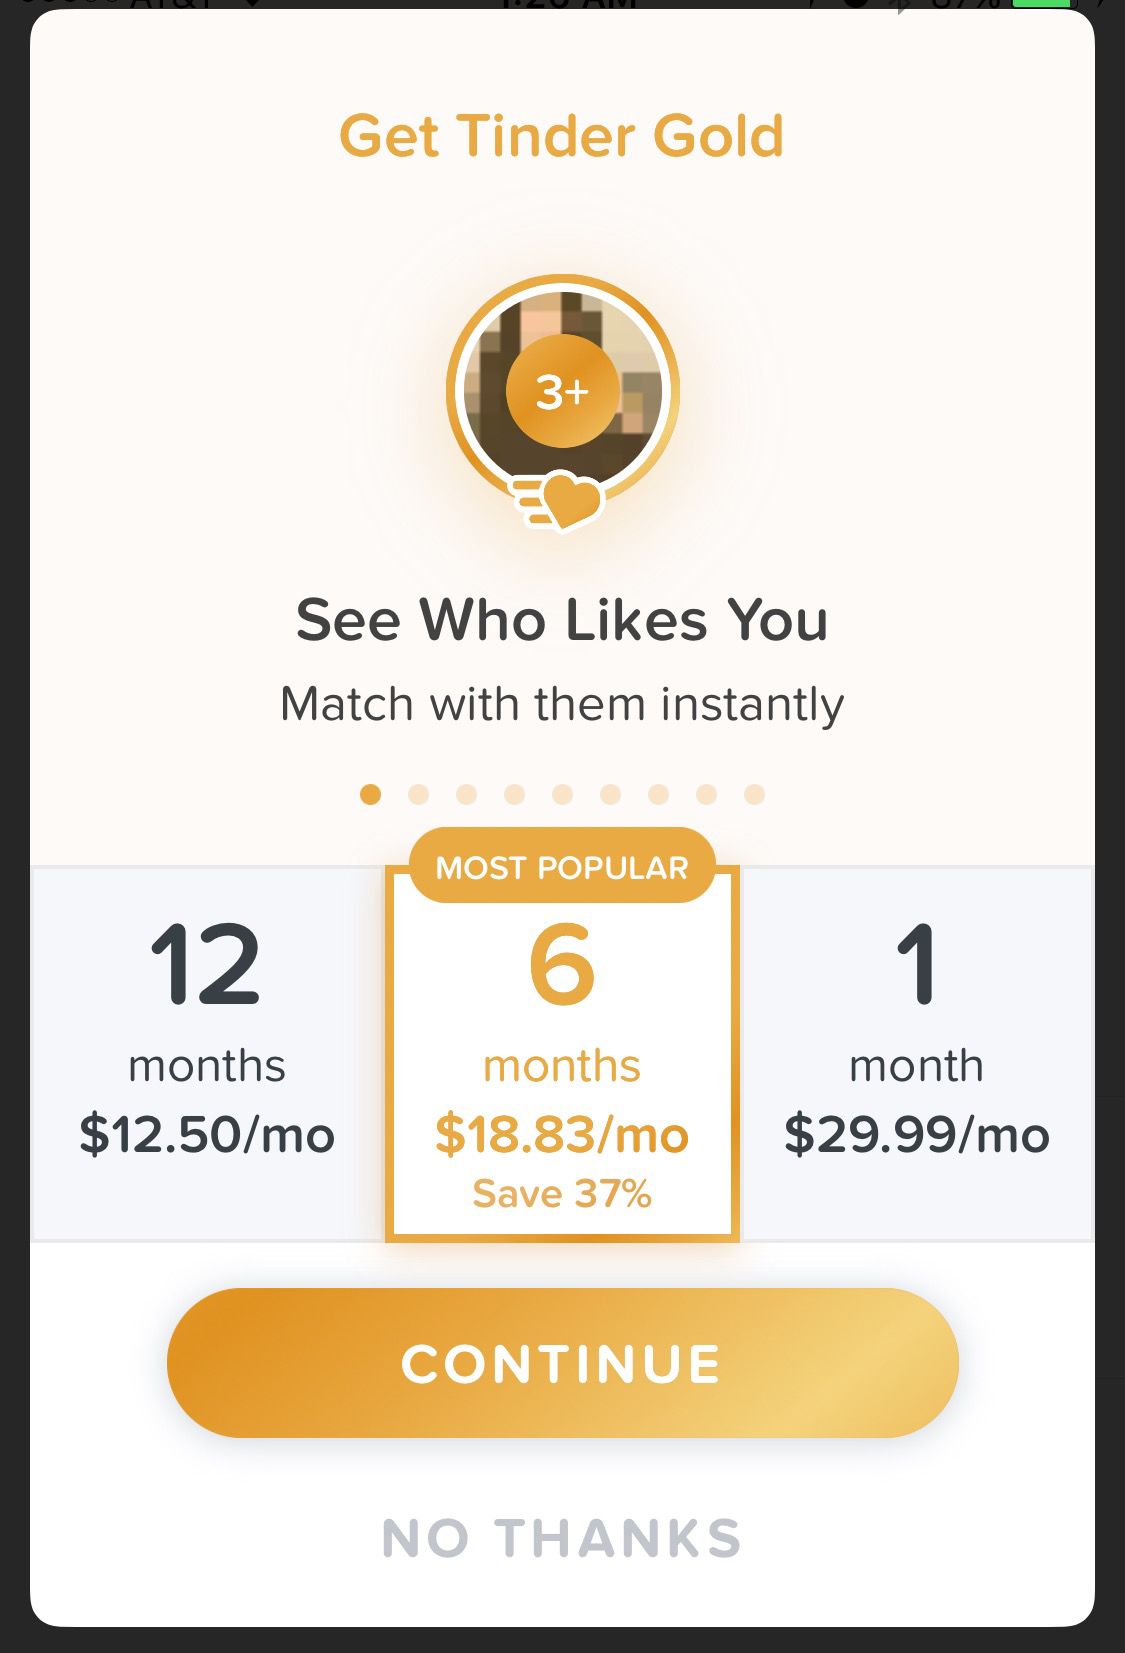
For example, look at how Tinder works. It is free, so users can swipe left and right, chat and customize their profiles. This is enough to use it for its main purpose. However, Tinder offers some additional features with a Tinder Plus and Tinder Gold subscriptions, that allow such features as rewind, extra super likes, ability to see who liked the user and others.

Subscriptions can be auto-renewable and non-renewing.
In case with auto-renewable subscriptions the app takes the money from user’s account periodically till the user decides to cancel the subscription.
Non-renewing subscriptions need users to renew the subscription each time.
How it works
How do you actually transfer the money in case with in-app purchase? It is very easy – all the payment information is already stored on the device, and a user just needs to add it to the app store in a checkout section. Android users will pay for whatever they want in your app through Google Play, and iOS users will do it through App Store.
For in-app billing for iOS applications will need StoreKit, and Android apps use In-app Billing API which you can find in Android SDK.
The items you sell through an IAP are divided into two groups:
- Instantly Available Content
- Deliverable Content
To put it simple, the difference between these two types is whether users will need to download the thing they paid for, or it will be available right away.
Instantly available content is available thanks to the unique identifiers for each item (SKUs). They are stored in a catalog and can be opened right after the successful payment. Usually, it is about the additional features, so developers tend to implement them beforehand.
In this case, StoreKit or In-app Billing API are responsible only for the money transfer and they show whether the purchase was successful.
Deliverable content requires downloading the content from your server. This allows you to offer new items for sale. Usually, deliverable items are connected with subscription model of in-app purchases.
This model is more flexible and more complex, as there are three sides that take part in the transaction: iOS or Android app, app store server and your own backend. All the new features or items are stored in the server, so there is no need to update the application to add new features or products.
The whole process of in-app purchasing in a server model takes these steps:
- The app requests for a product list from its server;
- The app displays the new products to the user;
- The user purchases something;
- The app uses StoreKit or In-app Billing API to request for a permission to transfer the money from the Apple or Android server;
- The StoreKit or IAB API returns the answer;
- The app sends the answer to its server;
- The answer is checked once more;
- The app downloads the new product from its server.
You should also think about where the information about IAP of each user is stored. Your user may delete your app and when he or she installs it once again, all the information about IAPs needs to be there. In case with in-app billing for iOS, the developer will be able to request all the information about transactions from the App Store.
This is the whole process of in-app purchasing. However, there is one important detail that some people often forget about…
You won’t get all your money from each deal!
Transaction fees
…you will get only from 70% to 85% of money from each in-app purchase your users make
Yes, that’s true. The thing is, app stores take a commission for each payment because you are using their servers. And the transaction fees are pretty impressive – both Google Play in-app billing system and App Store cut 30% from each in-app purchase!
That sounds too much, doesn’t it? It seems that Google and Apple have realized that as well, so last summer Apple has lowered its subscription fee for developers to 15%. However, there are certain conditions – the app has to keep the subscriber for more than a year. Before that, Apple takes 20% of their revenue.
Google has different conditions: as long as your total earnings are under $1 million, you give Google 15% of what you earn. However, if the totoal earnings on all your Accociated Developer Accounts exceed $1 million, Google charges you 30% of your revenue.
So, in either case, you will get only from 70% to 85% of the money from each in-app purchase your users make. Not every app developer is happy about this idea, so some of them try to find ways to make the in-app purchase possible without a need to deal with app stores.
One way to avoid additional fees is to redirect your users to mobile websites, where they can pay for your products. However, there is a big obstacle to this – app stores won’t allow you to have any external links that bring a user to the site that asks for payment. In case they notice it (and they will), your app will be rejected until you get rid of those links. You should pay additional attention to this if you want to implement iOS in app purchase, because App Store is very strict about it.
That means, that you can sell your content through your website, but you can’t mention it in your app.
Is it worth it?
If you feel discouraged about the transaction fees, don’t be. In-app purchase is still one of the best ways to monetize an app. For games and startups it is in most cases a better option than to make your app paid.
Moreover, in-app purchases are extremely profitable. How can that be, if only 5% of all mobile users are into in-app purchasing, according to the study by AppsFlyer? The secret is simple – those 5% spend 20 times more money in apps than an average user. So, in the end, companies earn more from in-app purchases than from all other users.
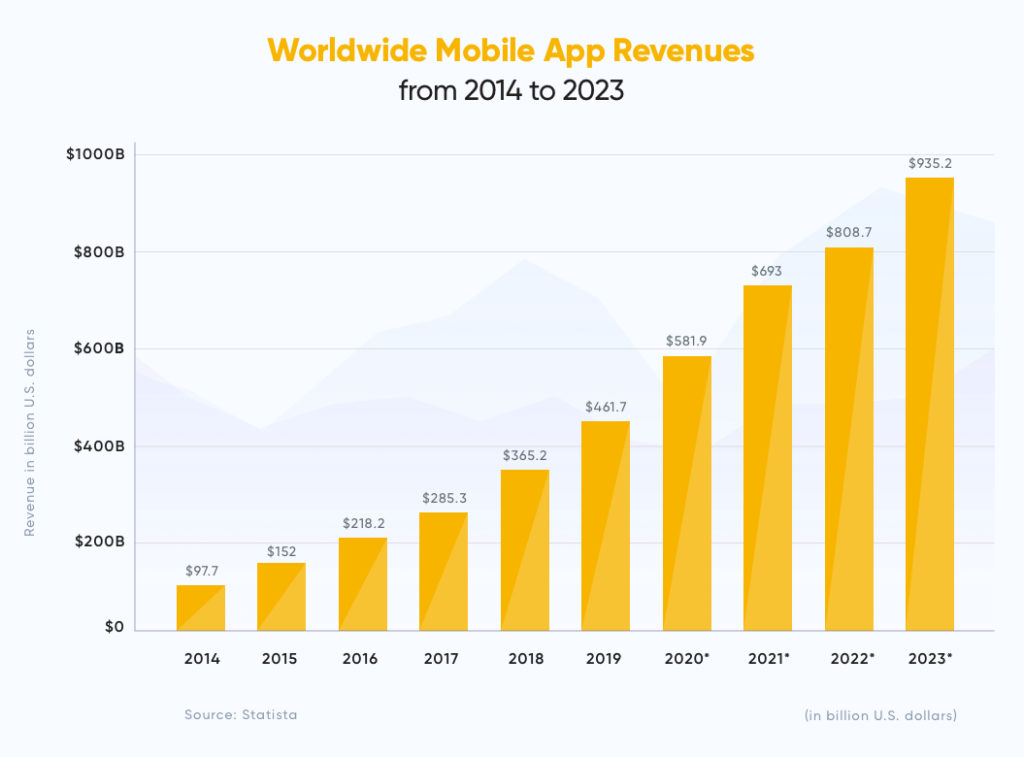
According to Statista’s forecast, the global in-app purchase revenue is going to hit more than $70 million by 2020.

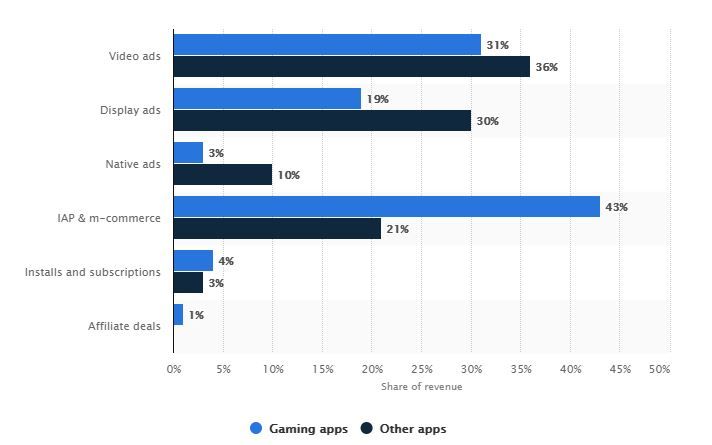
And here is another impressive statistics that shows how revenues are distributed. As you can see, in-app purchases is №1 source of mobile app revenues in the world, especially for gaming apps.

Despite the fact, that app stores really charge a lot for each IAP, it is totally worth it in a long run – your job is to attract that small group of people that actually loves to make in-app purchases and does it regularly.
The next piece of data might help you with that.
As it turns out, there is a correlation between making in-app purchases and a kind of device a person owns. AppsFlyer states, that iOS device owners are likely to spend 2.5 times more on IAP than Android owners.
While Android owners on average spend only $0.43 for an IAP, iOS owners spend $1.08.

To increase your IAP sales, think about your target country – in some countries there are more people who will gladly buy a new character in your game or pay for some additional features.
According to the AppsFlyer’s statistics, Asian market is the most active when it comes to IAP. US comes in the second place, and while Asian users spend more money per month, Americans tend to spend the highest amount on a single IAP.
Now we’d like to share with you our experience in integrating in-app billing into an iOS app.
How to implement in-app purchase in iOS
1. Set your in-app purchase in iTunesconnect
For this you will need to authorise into your iTunesConnect account and go directly to Features section of your project. From there go to In-app Purchases and press a Plus-button.

There you’ll be able to select a type of IAP that we talked about earlier in this article. We chose Consumables as an example.

Now you have your first IAP ready for customization!

Here you’ll need to set up a Reference Name – no one but you will see it, so it’s only for your convenience. Product ID is more important, and usually it is generated this way:
Bundle ID (in our case: net.mobindustry.myapp) + your product’s ID (gold_100)
Next thing you’ll need to do is to select a price (a tier) for your product.

Note! These are the prices your consumers will see. This means, that you will get 70% of this money out of each transaction.
Next thing you can do is to assign a picture for each of your products, for example, a sack of golden coins.
2. Set up the purchase structure
In order to create the structure for purchasing gold, we will need a product ID from App Store.
With their help we can get all the products with the mentioned ID from App Store. Here’s the code for that:
public struct ProductGold {

  public static let gold_100 = "net.mobindustry.myapp.gold_100"

  public static let service = StoreService(productIds: [ProductGold.gold_100])
}
3. Set up class and request
You will need to use a request to get a set of IDs. You will need to call this block after the request is done.
public typealias RequestBlock = (
success: Bool,
products: [SKProduct]?) -> ()

open class StoreService : NSObject  {

  fileprivate let productIdentifiers: Set

  fileprivate var purchasedProductIdentifiers = Set()
  fileprivate var request: SKProductsRequest?
  fileprivate var requestBlock: RequestBlock?

  public init(productIds: Set) {
    productIdentifiers = productIds
    for productIdentifier in productIds {
      let purchased = UserDefaults.standard.bool(forKey: productIdentifier)
      if purchased {
        purchasedProductIdentifiers.insert(productIdentifier)
      }

    }
    super.init()
    SKPaymentQueue.default().add(self)
  }

}
4. Get SKProduct
This is a method which helps to get the requested products from App Store.
public func requestProducts(completionHandler: @escaping RequestBlock) {
    request?.cancel()
    requestBlock = completionHandler

    request = SKProductsRequest(productIdentifiers: productIdentifiers)
    request!.delegate = self
    request!.start()
  }
5. Request delegate
Now your server will work as a request delegate. For this we need this code:
extension StoreService: SKProductsRequestDelegate {

  public func productsRequest(_ request: SKProductsRequest, didReceive response: SKProductsResponse) {
    let products = response.products
    requestBlock?(true, products)
    wipeBlockAndRequest()
  }

  public func request(_ request: SKRequest, didFailWithError error: Error) {
    requestBlock?(false, nil)
    wipeBlockAndRequest()
  }

  private func wipeBlockAndRequest() {
    request = nil
    requestBlock = nil
  }
}
6. Purchase
Now we get to the purchase itself. The product is the same that we got previously after our request.
public func buyProduct(_ product: SKProduct) {
    let payment = SKPayment(product: product)
    SKPaymentQueue.default().add(payment)
  }
We can track the transaction stages by conforming to protocol SKPaymentTransactionObserver. These are the methods you use to do that:
extension StoreService: SKPaymentTransactionObserver {

  public func paymentQueue(_ queue: SKPaymentQueue, updatedTransactions transactions: [SKPaymentTransaction]) {
    for transaction in transactions {
      switch (transaction.transactionState) {
      case .purchased:
        complete(transaction: transaction)
        break
      case .failed:
        fail(transaction: transaction)
        break
      case .restored:
        restore(transaction: transaction)
        break
      case .deferred:
        break
      case .purchasing:
        break
      }
    }
  }

  private func complete(transaction: SKPaymentTransaction) {
    deliverPurchaseNotificationFor(identifier: transaction.payment.productIdentifier)
    SKPaymentQueue.default().finishTransaction(transaction)
  }

  private func restore(transaction: SKPaymentTransaction) {
    guard let productIdentifier = transaction.original?.payment.productIdentifier else { return }
    deliverPurchaseNotificationFor(identifier: productIdentifier)
    SKPaymentQueue.default().finishTransaction(transaction)
  }

  private func fail(transaction: SKPaymentTransaction) {
    SKPaymentQueue.default().finishTransaction(transaction)
  }

  private func deliverPurchaseNotificationFor(identifier: String?) {
    guard let identifier = identifier else { return }

    purchasedProductIdentifiers.insert(identifier)
    UserDefaults.standard.set(true, forKey: identifier)
    UserDefaults.standard.synchronize()
  }
}
That’s it! Now you know how to implement iOS in-app purchases.
How to increase in-app purchases
Mobile application is expensive to build and maintain, so whether in-app purchases are the main or additional source of your revenue, it’s important to constantly find ways to increase it. Let’s look at five main ways to encourage your users to purchase services and products in your app.
1. Improve your targeting
To encourage your users to spend money in your app, it’s important to understand what you can offer them and what they’re most interested in. For this, you need to learn information about your users, analyze their behavior and personalize your marketing efforts. It’s also important to treat users differently depending on how long they’ve been using your application. Engage new users with interesting offers and retain the old users with personalized discounts based on what products or services they purchase regularly.
2. Create demand by limiting the offer
Grab the discount now, the sale ends at 03:41!
Missing out is what’s hard to deal with for most people. You can use it to your advantage by limiting your offers. Here are a few ways to use this strategy effectively:
- limit the time of the offer
- limit the number of products available
- provide unique discounts that are available only a few times a year
All these are classic strategies of sellin products that are used in almost any kind of business, from retail to food delivery, and you can use it to your advantage too.
3. Use personalized messages and notifications
In-app messages, push notifications, emails: all these are great ways to promote your products through personal communication. You can send in-app messages right when your user is browsing your app, and remind users about your app by sending them push notifications.
Use your creativity, but don’t overdo the promotion! All communication should be used in moderation, otherwise you risk getting your app deleted.
4. Figure out your pricing strategy
Going too high with your prices is as bad as going too low, so it’s important to research the market, find the average prices and develop your own pricing strategy based on your target audience and your services. It’s also a good idea to give your users a choice of options that are priced differently: usually there’s always the most popular option that has the best balance of price and benefit. Highlight it, to help your users make the best choice.
Conclusion
We think that now you are convinced that in-app purchase is a great way to get money from the app you’ve worked on so hard.
If you want to choose IAP as your strategy for monetizing, however, be very careful with confirmation procedures. Your users need to know exactly what they spend money on and how much that will cost them. Hidden payments and unconfirmed withdrawals are not cool! In-app purchases are sometimes criticized for those things, so make sure that IAPs in your app are clear, secure and smooth.
Our company has experience in developing gaming apps as well as helping with their monetizing and app store promotion, so if you are interested in developing an app with IAPs or you want to add those to your existing application, Mobidnustry is right for you. We provide other kinds of Android and iOS app development services as well, so don’t hesitate to contact us!
Article written by:
Dmitriy Pashynskyi
Frequently Asked Questions
To implement in-app purchases: you need to:
- Add the billing library to the app.
- Add the billing library dependency.
- Initialize the billing client instance.
- Connect to Google Play.
- List available purchases.
- Launch the purchase flow.


