Integrating Salesforce’s Live Agent into Your Mobile App
Salesforce is one of the most popular cloud solutions providing powerful tools for businesses in the digital age. With a cloud-based Customer Relationship Management (CRM) system at its core, this platform has build a huge ecosystem around itself. It has a variety of development tools and components to assist with various business tasks on any device.
Salesforce is one of the most popular cloud solutions providing powerful tools for businesses in the digital age. With a cloud-based Customer Relationship Management (CRM) system at its core, this platform has build a huge ecosystem around itself. It has a variety of development tools and components to assist with various business tasks on any device.
Salesforce’s main idea is to support any business infrastructure, and mobile applications are no exception. Salesforce provides businesses with ecommerce and m-commerce solutions. Mobile apps can be integrated with Salesforce and provide the best service for clients and work environment for your team.
According to statistics, customer support is the most popular service from CRM systems. If you already have one, Salesforce would be a great addition to your m-commerce toolbox, as it allows you to integrate it with minimal development effort on Android or iOS. Say, you have a well-established 24/7 customer support system in your Salesforce account and want to integrate the same support on your mobile client app. There is no need to come up with another business process – Salesforce Live Agent for mobile applications is the tool you need to integrate.
In this article, we will discuss Salesforce Live Agent integration and explain how to implement live agent on mobile applications and сustomize it based on our experience and Salesforce documentation. You only need basic Javascript knowledge to implement it yourself. We will cover the basic steps of integrating Live Agent, and problems that may arise, as well as solutions for them.
Live Agent is a Salesforce component that allows a user to start a live chat with a customer support team. The Live Agent library encapsulates its functionality, and that may be a problem. While there are a number of customization options, there may not be enough to ensure the chat screen will look exactly like your normal app color scheme & style. To make the chat UI look natural, you may need to implement and personalize it by yourself and then use chat APIs directly.
How to setup Live Agent
To start the setup process, you need to login to your SalesForce panel in your browser and go to Setup. The Live Agent chat requires 4 values to initialize it, which are:
- pod name
- organization ID
- deployment ID
- button ID
The pod name is the hostname for the Live Agent pod that was assigned to your organization. Search for Live Agent Settings from Setup and copy the hostname from the Live Agent API Endpoint to get this value.

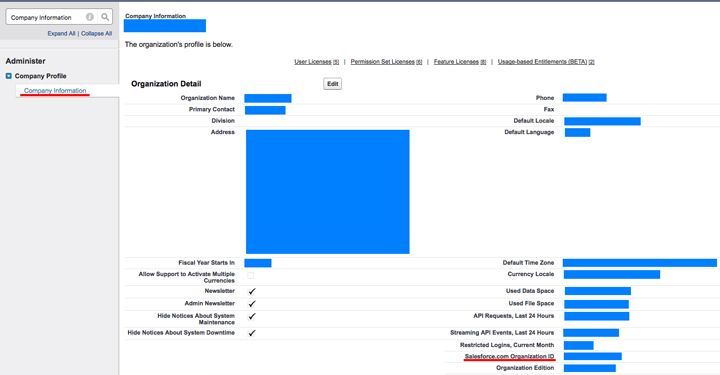
Organization ID – The Salesforce ID for your organization. To get this value, go to Setup, search for Company Information and copy the Salesforce Organization ID.

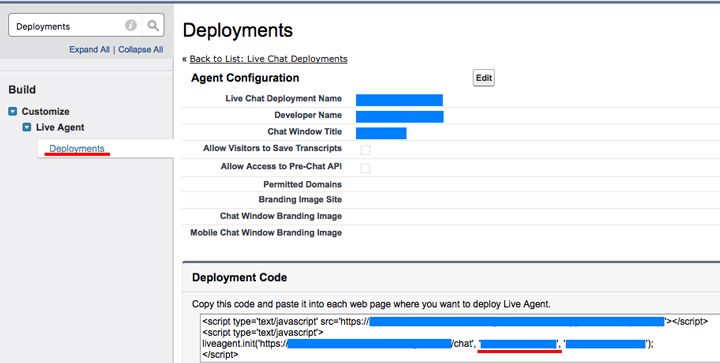
Deployment ID – the unique ID of your Live Agent deployment. Go to Live Agent | Deployments from Setup to get it. You will be able to see a call to the liveagent.init function with the pod, and deployment and org IDs as arguments. Find the deployment ID and copy it.

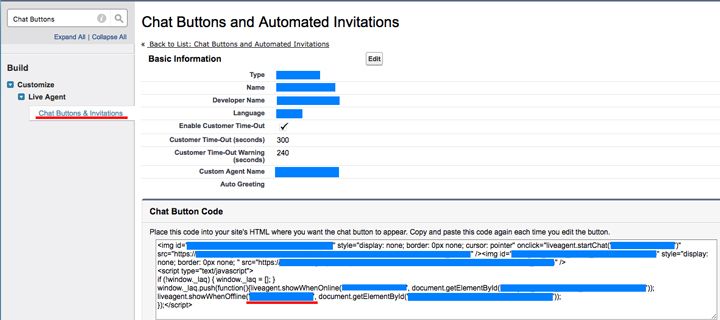
The Button ID is the unique button ID for your chat configuration. Create a Live Agent chat button, but just copy the ID attribute instead of using JavaScript. After you create the button, you’ll be able to get the ID. Just search for Chat Buttons from Setup and select Chat Buttons & Invitations. You will find your ID for the button from the JavaScript snippet there. Copy this value as well.

Now you have everything you need to get started with Live Agent integration in a native mobile app through the API.
Connecting to the Live Agent API
The Live Agent connection is performed through a of 3 API calls. They are the following:
1. Receiving session key
First of all, we need to get the session key for the conversation.
The API endpoint to be called is:
GET: https://your.pod.name.here.com/chat/rest/System/SessionId
The HTTP header fields are:
X-LIVEAGENT-API-VERSION – Salesforce API version to be used (38 for example).
Request bodyparameters:

Empty.

Response:

{

clientPollTimeout = 40;

id = "24e6a6f3-5601-446b-9250-cea8e0955a3e";

key = "24e6a6f3-5601-446b-9250-cea8e0955a3e!1495522493087!Wkr3R+LhSXlgl9xc7vpVc0S2d4o=";

}
We need to save the ID (as session ID) and the key (as session key) as we’ll be using them for future requests. If this request was successful, we can continue.
2. Initializing the chat session
If the GetSessionID request was successful, we need to call this request immediately after.
The API endpoint to be called is:
POST: https://your.pod.name.here.com/chat/rest/Chasitor/ChasitorInit
HTTP header fields:
X-LIVEAGENT-SESSION-KEY – Session key received from Session/SessionId API
X-LIVEAGENT-API-VERSION – Salesforce API version to be used (38 for example).
Request bodyparameters:

{

    buttonId = your_button_id;

    deploymentId = your_deployment_id;

    isPost = 1;

    language = "en-US";

    organizationId = your_organization_id;

    receiveQueueUpdates = 1;

    screenResolution = "";

    sessionId = «your_session_key»;

    userAgent = «iOS»;

    visitorName = «John Doe»;

    prechatDetails =     (

                {

            displayToAgent = false;

            entityMaps = ();

            label = "Session Key";

            transcriptFields = ();

            value = «session_key_value»;

        }

    );

}
PrechatDetails is an array of PrechatDetail data models. Prechat details can be used to pass additional data to the advisor. The session key is passed here as an example. The DisplayToAgent field determines if the value will be shown to the advisor in the chat details or not.
Response:

Empty
3. Observing messages.
As soon as the chat session is established, we need to start listening for messages. Before making this call, you need to have an active advisor. For this, you should go to your Salesforce console, select “CSS Advisor console” and set your Live Agent status to Online.
API endpoint to be called is:
GET: https://your.pod.name.here.com/chat/rest/System/Messages
HTTP header fields are:
X-LIVEAGENT-SESSION-KEY – Session key received from Session/SessionId API
X-LIVEAGENT-API-VERSION – Salesforce API version to be used (38 for example).
Request bodyparameters:

Empty


Response:

//Chat request successful

{

    messages =     (

                {

            message =             {

                connectionTimeout = 280000;

                customDetails =                 (

                );

                geoLocation = {};

                queuePosition = 1;

                sensitiveDataRules =                 (

                );

                url = "";

                visitorId = "f0dc2e61-5b22-4297-ae91-f98dfc1131c6";

            };

            type = ChatRequestSuccess;

        }

    );

    sequence = 0;

}


//Chat message received

{

    messages =     (

                {

            message =             {

                agentId = 005260000025AUK;

                name = John;

                text = Message text goes here;

            };

            type = ChatMessage;

        }

    );

    offset = 30211368;

    sequence = 4;

}
As soon as the request has been completed successfully (status code is 200 or 204), we need to run this request again. The request should run in a loop as long as the chat is active. The response object has a common structure and the difference depends on the message type. If the request is successful, we need to take the messages field from response object and process each message. In most cases, there will be only one message in the array, but in some cases (like a bad Internet connection) multiple messages can appear.
Possible messages types:
- ChatRequestSuccess – the chat request call was successful.
- ChatEstablished – indicates that chat session with advisor was established.
- ChatMessage – a regular chat message received.
- ChatEnded – appears when the chat was ended by the advisor – saves all necessary data, notifies the user, and closes the chat.
- ChatRequestFail – indicates that there are no active (free) advisors at the moment – notifies the user, asks them to try later, and closes the chat.
- AgentTyping – indicates that advisor is typing a message. May be received several times in a row.
- AgentNotTyping – indicates that advisor finished typing a message.
Now we are able to connect with Live Agent and receive messages. But how can we send one?
4. Sending messages
API endpoint to be called is:
POST: https://your.pod.name.here.com/chat/rest/Chasitor/ChatMessage
HTTP header fields:
X-LIVEAGENT-SESSION-KEY – Session key received from Session/SessionId API
X-LIVEAGENT-API-VERSION – Salesforce API version to be used (38 for example).
Request bodyparameters:

{
    text = «Message text goes here«;

}


Response:

Empty
5. Closing chat session
After the conversation is finished and the user closes the chat screen, we need to close the chat session correctly.
The API endpoint to be called is:
POST: https://your.pod.name.here.com/chat/rest/Chasitor/ChatEnd
HTTP header fields:
X-LIVEAGENT-SESSION-KEY – Session key received from Session/SessionId API
X-LIVEAGENT-API-VERSION – Salesforce API version to be used (38 for example).
Request bodyparameters:

{

    reason = «Closed by client»;

}
You may specify the reason of why chat session was ended.
Note: You will not receive a ChatEnded message for this action, it will only be sent a message if the chat is ended by the advisor.
Response:

Empty

//TODO: sending images via custom events

//TODO: connecting push notifications for advisor messages
That’s it! Now your application can use Salesforce’s API and has a customized UI design, including for customer support form.
Conclusion
In this article, we covered just one of many possible integration tasks and processes for your ecommerce business. Salesforce integration solutions are often not as obvious as they seem in the documentation, but everything is still possible with an experienced team.
Mobindustry would be glad to provide consultation on your integration of Salesforce Live Agent in mobile apps or on other Salesforce-related projects – just send us a request.
Article written by:
Pavel Peday


