How to Successfully Integrate Apple Pay into Your iOS App?
A payment gateway is one of the most important things you should set up in your mobile solution if you plan to sell things through it. If a page takes too long to load, customers tend not to make the purchase. Integrate Apple Pay in iOS app to make paying fast and easy for your customers.
Reasons for Apple Pay App Integration
When thinking about mobile app development consider integrating Apple Pay into your iOS app. The payment process should be as quick and easy as possible. There are already lots of people who make online purchases through mobile apps, and if you make your checkout simple, your customers will gladly use it.
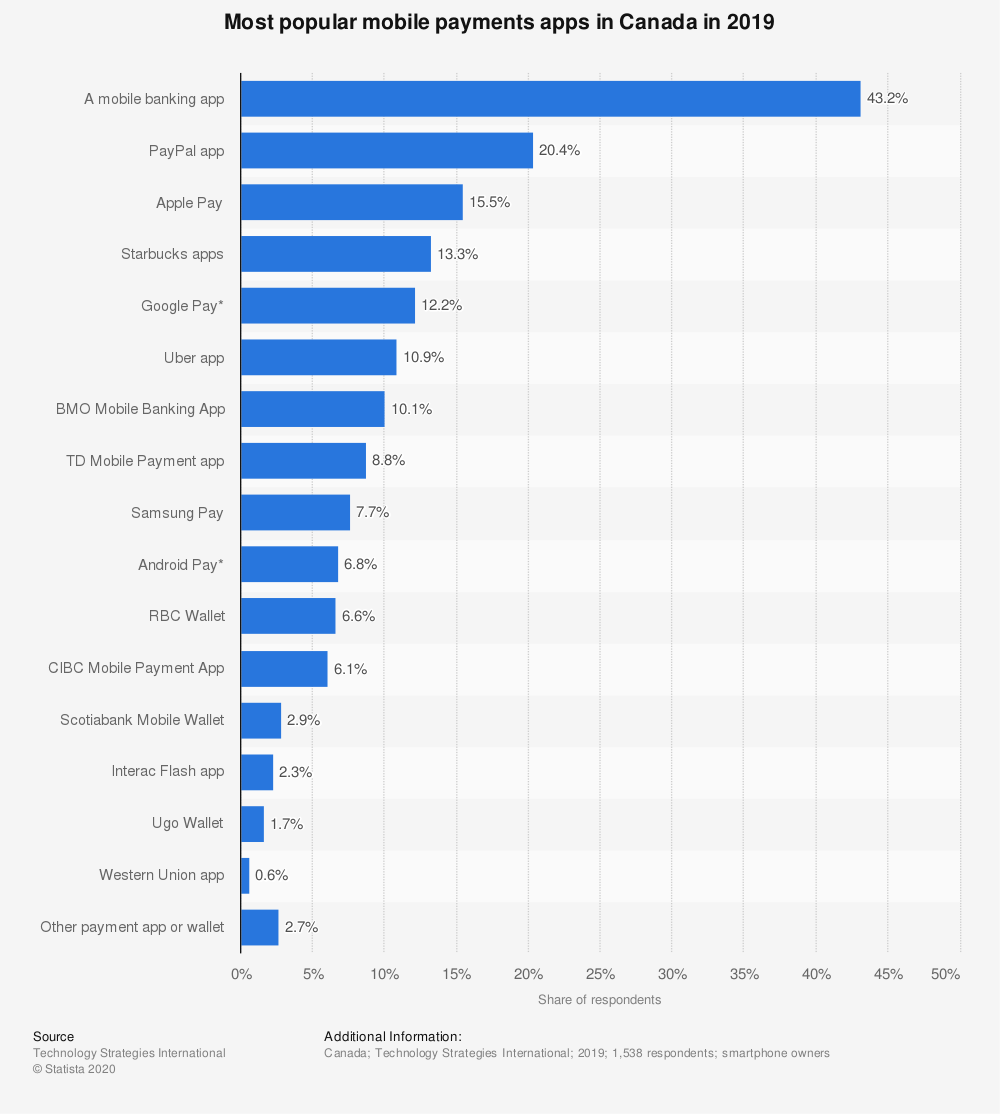
According to Statista, Apple Pay is the third most popular payment app in Canada.

Apple made payments really simple with Apple Pay technology, which lets you pay for things with one touch. Apple Pay integration in iOS apps allows to get and send payments right in Messages or through Siri. Also, it manages cards and can send cash right to bank accounts.
There are two ways you can use Apple Pay for your business. First one is selling products with NFC. It allows people to use Apple Pay by paying right in the store with their iPhones. For this, the shop owner will have to install NFC terminals. The second is using Apple Pay within the iOS app.
Apple Pay is considered to be a safer payment method as it uses a device-specific number and a unique code. It doesn’t require to store a card number on the device, and merchants don’t see it either.
Security is especially important, because according to the statistics over 50% of users are concerned about their personal information exposure.
There are some concerns about the usage of Apple Pay among iPhone users, however: statistics show that only 27% of iPhone users actually make payments with Apple Pay. However, the reason is that while over 60% of merchants support it, this technology hasn’t received massive adoption yet.
The reason of that is slow adoption by small merchants. People would gladly stop carrying their wallets and credit cards with them, but they still have to, as not so many shops actually accept Apple Pay.
Still, according to The Wall Street Journal, Apple CEO Tim Cook says that the number of people who use the service tripled over 2017. Apple seems very determined to replace traditional payment methods, whether it takes one year or three.
If you own a mobile app, however, iPhone and iPad users will definitely appreciate the ability to make purchases with Apple Pay. While most problems with its adoption concern brick-and-mortar stores, using Apple Pay in mobile apps and on the web is way more popular.
For your business to succeed, you’ll need to offer several payment methods including Apple Pay.
If you want to learn how to integrate Apple Pay, continue to read. In this article, we give you an Apple Pay integration guide with some tips and clear instructions.
How to Set Up Apple Pay in Your App
To do Apple Pay integration Swift 4 is a language to go for.
To set up your environment for integrating Apple Pay into an app, you must complete these steps:
- Create a Merchant ID
- Configure Apple Pay capabilities in Xcode for your project
- Create a sandbox user in iTunes Connect
- Add a test card
- Create a payment request in your project
- Handle the result
Let’s talk about each of these steps in detail.
-
- Navigate to https://developer.apple.com and sign in to your developer account. Navigate to Certificates, Identifiers & Profiles.

Go to the Identifier section and choose App ID.
Make sure that you select the Explicit App ID, because if it isn’t, the wildcard App IDs won’t be able to make payments with Apple Pay. Also, you should check the Apple Pay checkbox under App Services.
After you do that, click Continue and Submit. Now the creation of your new App ID is complete!
Now navigate to the Merchant ID section.

Click the + icon.

You’ll end up here:

Enter whatever description you want, then create a Bundle ID for your app starting with the word “merchant.” For example, “merchant.com.yourcompany.yourapp.”
-
- Navigate to your project in XCode, select .xcproject, and choose Capabilities.
Switch on the Apple Pay toggle and insert your Merchant ID. Expand the Apple Pay section and make sure there switch on the right is ON. After you refresh the page, you will see the list of the merchant ID you added on the developer portal.
Make sure that the Team box is pointing to the right development team that corresponds to the App ID and merchant ID you’ve created.
After you check everything, your screen will look like this:

Make sure that all three items in Steps are checked.
-
- Create a new Gmail account.
Then navigate to https://itunesconnect.apple.com/ and choose Users and Roles on the main page.


Choose Sandbox Testers and click the + icon.

It’s important to choose a country where Apple Pay is enabled.
Confirm your newly created Apple ID by Gmail.
-
- Change the iPhone region to the United States.
Log out from your current iCloud account on iPhone and sign in with the sandbox user.
Add a test card to Apple Pay on iPhone. For example:
FPAN: 5204 2477 5000 1505
Expiration Date: 11/2022
CVC: 111
-
- Create a payment in your app.
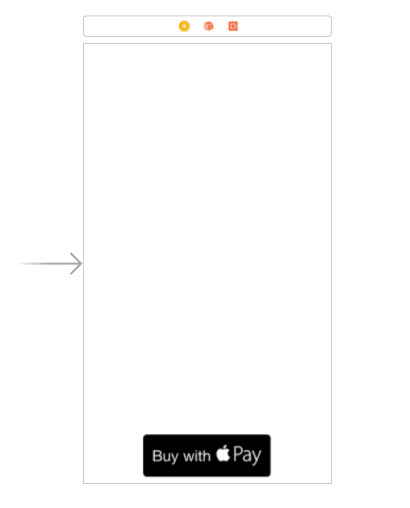
Add any button to the ViewController in the storyboard.

Next, connect IBAction (this used to be called purchaseItem) to your ViewController.swift.
To be able to use Apple Pay, go to the top of the ViewController.swift file and insert this:
Import PassKit
Now we can configure our payment request in purhcaseItem():
@IBAction func purchaseItem(_ sender: Any) {
        let request = PKPaymentRequest()
        request.merchantIdentifier = "merchant.net.mobindustry.likeMe"
        request.supportedNetworks = [PKPaymentNetwork.visa, PKPaymentNetwork.masterCard, PKPaymentNetwork.amex]
        request.merchantCapabilities = PKMerchantCapability.capability3DS
        request.countryCode = "US"
        request.currencyCode = "USD"

        request.paymentSummaryItems = [
            PKPaymentSummaryItem(label: "Some Product", amount: 9.99)
        ]

        let applePayController = PKPaymentAuthorizationViewController(paymentRequest: request)
        self.present(applePayController!, animated: true, completion: nil)
    }
Run your app and you’ll see this when you click the Buy with Apple Pay button:

- Add this to purchaseItem():
applePayController?.delegate = self
Then create the extension:
extension PaymentViewController:
PKPaymentAuthorizationViewControllerDelegate{
    func paymentAuthorizationViewControllerDidFinish(_ controller: PKPaymentAuthorizationViewController) {
        controller.dismiss(animated: true, completion: nil)
    }
    func paymentAuthorizationViewController(_ controller: PKPaymentAuthorizationViewController, didAuthorizePayment payment: PKPayment, handler completion: @escaping (PKPaymentAuthorizationResult) -> Void) {
        completion(PKPaymentAuthorizationResult(status: PKPaymentAuthorizationStatus.success, errors: []))
    }
}
To imitate successful payment and check if apple pay integration in ios app is complete, you should normally fulfill the payment request with your chosen payment system (Stripe, Visa, etc.).
As you can see in the code above, to do this we’ve inserted this piece of code into the didAuthorizePayment method:
completion(PKPaymentAuthorizationResult(status: PKPaymentAuthorizationStatus.success, errors: []))

Now you know how to integrate Apple Pay into iOS app development project. If you have any questions about integrating iOS app with Apple Pay, contact Mobindustry and hire experienced iOS developers. We’ll gladly help you with any issues and can develop a great app that will be able to accept payments quickly and easily.
Article written by:
Valerii Maliuk


